retrogamecoders wrote: ↑Fri Dec 12, 2025 7:10 pm
Thank you, I updated the code in the IDE so this is the latest
First of all, thank you for the example, which allowed me to highlight a bug in the multicolor image conversion routine. So, first of all, I ask you to update the compiler on your online IDE (I don't know if you're using the binary version or the source code, but I've updated both).
The first thing to note is that the transparency mechanism in multicolor mode works exclusively on the bitmap component, not the color one. In other words, this mode requires transparency masking operations to occur only on the index "plane," ignoring the color map. This means, in practice, that the drawn image won't be visible unless the underlying color has already been set. So, it's necessary to remove
WITH TRANSPARENCY, at least for this specific example. I also changed the image, making sure it has a white background:
Code: Select all
PUT BITMAP sprites FRAME 1 AT elfx,elfy
A theoretical description can be found
here.
Running the source code, you'll notice the "strip," because the background isn't restored. At this point, it's best to switch to multiplexed sprites. To use these sprites, however, you must abandon the ability to switch between resolutions and use a single one. In short, you have to choose between 320x200 or 160x200 pixels. To get a working source, I switched to the 320x200 version, which allows transparency using
PUT IMAGE.
The code is this:
Code: Select all
	BITMAP ENABLE(2)
	DEFINE MSPRITE ASYNC
	COLOR BORDER WHITE
	CLS WHITE

	xmas := LOAD IMAGE("xmas.png")
	snowpic := LOAD IMAGE("snow.png")
	elfpic := LOAD IMAGE("elf.png") EXACT

	CONST limitx = SCREEN WIDTH - SPRITE WIDTH

	RANDOMIZE

	FOR idx = 1 TO 25
	  x=RND(320-IMAGE WIDTH(snowpic))
	  y=RND(75)+75
	  PUT IMAGE snowpic AT x,y WITH TRANSPARENCY
	NEXT

	PUT IMAGE elfpic AT 200, 50 WITH TRANSPARENCY
	PUT IMAGE xmas AT 80, 0 WITH TRANSPARENCY

	sprites := LOAD ATLAS("xmas_sprites2.png") FRAME SIZE (24 , 24) EXACT

	sprite1 = MSPRITE( IMAGE( sprites FRAME 1 ) )
	sprite2 = MSPRITE( IMAGE( sprites FRAME 2 ) )
	sprite3 = MSPRITE( IMAGE( sprites FRAME 4 ) )

	DO

		SPRITE sprite1 ENABLE AT elfx+SCREEN BORDER X, 21+elfy+SCREEN BORDER Y
		SPRITE sprite2 ENABLE AT SCREEN BORDER X+limitx-elfx, 60+elfy+SCREEN BORDER Y
		SPRITE sprite3 ENABLE AT SCREEN BORDER X+elfx, 90+elfy+SCREEN BORDER Y
    	elfx=elfx+1
    	IF elfx > limitx THEN
    		elfx = 0
    	ENDIF

        MSPRITE UPDATE
	LOOP
For performance reasons, I used asynchronously multiplexed sprites, which require an explicit call to
MSPRITE UPDATE. In principle, this could have been done without, except for the initial
DEFINE: in that case, the sprites are updated when the relevant command is executed.
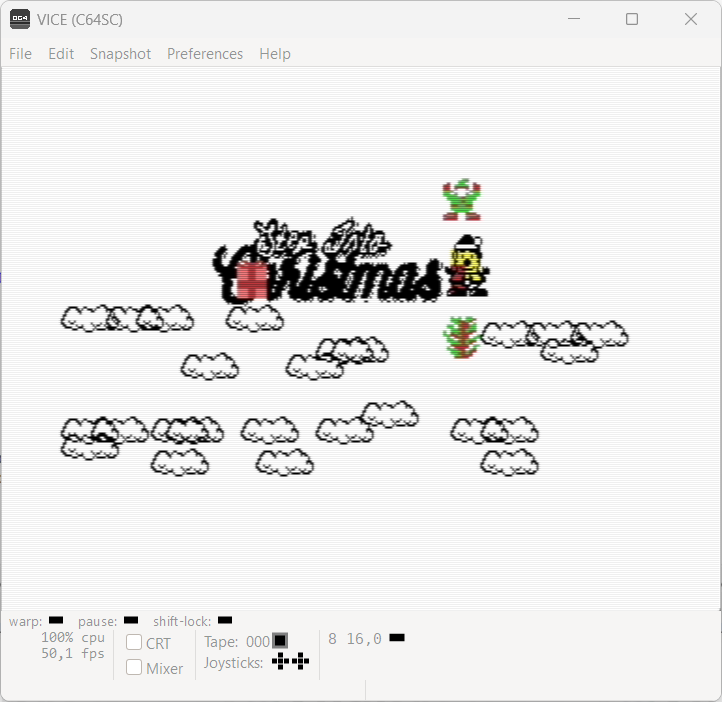
This is the result (I colorized the
elfpic.png image, to make evident the VIC-II limitations):
More info on sprites can be found
here.
Hope this helps!


