Hi everyone!
With the new version (and from the beta version) a new command has been introduced: DRAW.When you draw a figure onto a piece of paper, your pen starts at a particular place and it moves up or right for a certain amount, then down, and so on. The DRAW command allows you to repeat this process on the screen. The syntax is:
Code: Select all
DRAW string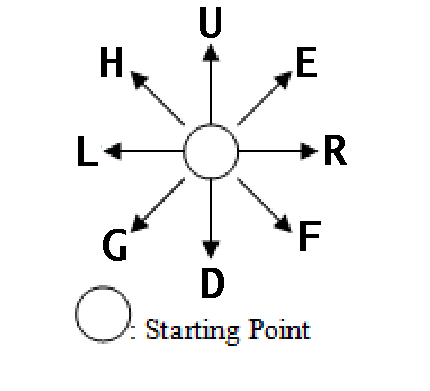
M x,y means move to the coordinates given by x,y, as in M128,96. This will move the pen to screen centre (if the screen has a resolution of 256x192 pixels). When you move to a point it is usually a good idea to make a "blank" move, that is move without drawing or lifting the pencil off the paper. If you do not you may get unwanted lines on your drawing. A blank move is done by using the letter B, any drawing instruction following the B will be drawn as a blank line (in other words: no modifications will be made).
Having decided the start point, you may now move up (U), down (D), right (R), or Left (L) by as many points as you like. The sequence U20R20D20L20 will cause a line to be drawn upwards 20 points for the start, then to the right 20, then down 20 and left 20, drawing a square. Apart from vertical and horizontal lines you can also draw diagonal lines. These use the subcommands E, F, G and H. So E12 will draw a diagonal line, 12 points long, at 45 degrees from the vertical. This allows diagonal lines to be drawn in any of 4 directions.
Code: Select all
DRAW "BM10,10;D4R4U4;BR2NR4D4R4UL2"Code: Select all
DRAW "BM10,10;C40;D4R4U4;C20;BR2NR4D4R4UL2"If the drawing is a bit small, we wall scale it up with the S parameter. The S means scale, and allows a drawing, or parts of a drawing to be scaled up or down in units of 1/4 (0,25). So S1 reduces the drawing to 1/4 scale, S2 to 2/4 (half) scale, S8 to 8/4 (2x) scale, and so on. The default setting for scale is S4 as the original size. Another option available is the angle parameter A. This allows us to rotate all or part of the drawing, as all lines after the A will be drawn with the displacement given by An, where n is a number between 0 and 3, as follows: 0 = 0 degrees, 1 = 90 degrees, 2 = 180 degrees, 3 = 270 degrees.
These are just the first instructions: now it's time to try it it!
Ciao a tutti!
Con la nuova versione (e dalla versione beta) è stato introdotto un nuovo comando: DRAW. Quando si disegna una figura su un pezzo di carta, la penna inizia da un punto particolare e si sposta verso l'alto o verso destra per un certo periodo, poi va verso il basso e così via. Il comando DRAW consente di ripetere questo processo sullo schermo. La sintassi è:
Code: Select all
DRAW stringM x,y significa spostarsi alle coordinate date da x,y, come in M128,96. Ciò sposterà la penna al centro dello schermo (se lo schermo ha una risoluzione di 256x192 pixel). Quando ci si sposta verso un punto, di solito è una buona idea fare una mossa "a vuoto", cioè spostarsi senza disegnare o sollevare la matita dal foglio. In caso contrario si possono ottenere linee indesiderate sul disegno. Una mossa vuota viene eseguita utilizzando la lettera B. Qualsiasi istruzione di disegno che segue la B verrà disegnata come una riga vuota (in altre parole: non verrà apportata alcuna modifica sullo schermo).
Dopo aver deciso il punto di partenza, ci si può spostare in alto (U), in basso (D), a destra (R) o a sinistra ([ b]L[/b]). La sequenza U20R20D20L20 farà sì che venga tracciata una linea verso l'alto di 20 punti per l'inizio, poi a destra di 20, poi in basso di 20 e a sinistra di 20 punti, disegnando quindi un quadrato. Oltre alle linee verticali e orizzontali si possono anche disegnare linee diagonali. Queste utilizzano i sottocomandi E, F, G e H. Quindi E12 disegnerà una linea diagonale, lunga 12 punti, a 45 gradi dalla verticale. Ciò consente di tracciare linee diagonali in una qualsiasi delle 4 direzioni.
Code: Select all
DRAW "BM10,10;D4R4U4;BR2NR4D4R4UL2"Code: Select all
DRAW "BM10,10;C40;D4R4U4;C20;BR2NR4D4R4UL2"Se il disegno è un po' piccolo, lo si può ingrandire con il parametro S. S significa "scala" e consente di ingrandire o ridurre un disegno o parti di esso in unità di 1/4 (0,25). Quindi S1 riduce il disegno a 1/4 di scala, S2 a 2/4 (metà) scala, S8 a 8/4 (2x) scala e così via. L'impostazione predefinita per la scala è S4 cioè come la dimensione originale. Un'altra opzione disponibile è il parametro A. Questo permette di ruotare tutto o parte del disegno, poiché tutte le linee dopo la A verranno disegnate con lo spostamento dato da An, dove n è un numero compreso tra 0 e 3, come segue: 0 = 0 gradi, 1 = 90 gradi, 2 = 180 gradi, 3 = 270 gradi.
Queste sono solo le prime istruzioni: ora è il momento di provarlo!
Avec la nouvelle version (et depuis la version bêta) une nouvelle commande a été introduite: DRAW. Lorsque vous dessinez une figure sur une feuille de papier, votre stylo commence à un endroit particulier et se déplace vers le haut ou vers la droite d'un certain montant, puis vers le bas, et ainsi de suite. La commande DRAW vous permet de répéter ce processus à l'écran. La syntaxe est :
Code: Select all
DRAW chaîneM x,y signifie se déplacer vers les coordonnées données par x,y, comme dans M128,96. Cela déplacera le stylet au centre de l'écran (si l'écran a une résolution de 256 x 192 pixels). Lorsque vous vous déplacez vers un point, c'est généralement une bonne idée de faire un mouvement "à blanc", c'est-à-dire sans dessiner ni soulever le crayon du papier. Si vous ne le faites pas, vous risquez d'avoir des lignes indésirables sur votre dessin. Un coup à blanc se fait en utilisant la lettre B, toute instruction de dessin suivant le B sera dessinée comme une ligne vierge (en d'autres termes : aucune modification ne sera apportée).
Après avoir décidé du point de départ, vous pouvez maintenant vous déplacer vers le haut (U), vers le bas (D), vers la droite (R) ou vers la gauche ([ b]L[/b]) par autant de points que vous le souhaitez. La séquence U20R20D20L20 fera tracer une ligne vers le haut de 20 points pour le départ, puis vers la droite 20, puis vers le bas 20 et vers la gauche 20, dessinant un carré. Outre les lignes verticales et horizontales, vous pouvez également tracer des lignes diagonales. Ceux-ci utilisent les sous-commandes E, F, G et H. Ainsi, E12 tracera une ligne diagonale de 12 points de long, à 45 degrés de la verticale. Cela permet de tracer des lignes diagonales dans l'une des 4 directions.
Code: Select all
DRAW "BM10,10;D4R4U4;BR2NR4D4R4UL2"Code: Select all
DRAW "BM10,10;C40;D4R4U4;C20;BR2NR4D4R4UL2"Si le dessin est un peu petit, nous l'agrandissons avec le paramètre S. Le S signifie échelle et permet d'agrandir ou de réduire un dessin ou des parties d'un dessin par unités de 1/4 (0,25). Ainsi, S1 réduit le dessin à l'échelle 1/4, S2 à 2/4 (demi), S8 à 8/4 (2x) escaliers, etc. Le paramètre par défaut pour l'échelle est S4 comme taille d'origine. Une autre option disponible est le paramètre d'angle A. Cela nous permet de faire pivoter tout ou partie du dessin, car toutes les lignes après le A seront dessinées avec le déplacement donné par An, où n est un nombre compris entre 0 et 3, comme suit : 0 = 0 degré, 1 = 90 degrés, 2 = 180 degrés, 3 = 270 degrés.
Ce ne sont que les premières instructions : maintenant, il est temps de l'essayer !